Virtual Reality: Saving and Importing VR Models

Things to look for in CAD Models

Whether it’s modeling custom components or using already created models, there are certain things that should be looked into before setting up the files for virtual reality. There is a want for these almost photo-realistic models that can be taken apart piece by piece, but depending on the file, that may not be entirely possible. Depending on the software being used, some may not be able to load items completely that contain im.ported bodies or surfaces. There will need to be some testing done with the software being used to see what limitations there are.

Designing with VR in Mind

There are a lot of little factors that come up when designing components to be viewed in virtual reality. One major thing to pay attention to is the overall file size. Having a total file size that is too large may lead to a lot of lag issues and stuttering when looking at the model. One way to help keep this down is to look into defeaturing a lot of the components. These item features may be great for things like showing customers the attention to detail or showing final renders that look near realistic, but for virtual reality, these items can make it almost impossible to view without having issues. A couple of components that come to mind are components that having threading. Having a screw for example that has the threads cut into the part compared to a screw that just has the appearance of threads will vary greatly in file sizes. Here is a screw with threads cut into the part and its current file size is 7,324 KB. Digging a little deeper we can see the highest quality that it takes a little over 302,000 triangles to create this part.

Figure 1: Screw with Threads

When the screw is defeatured, there is a huge drop in both overall file size and the number of triangles needed to create it. The file size is now 281 KB and only needs around 13,000 triangles. This is a massive file saver for large assemblies that could have hundreds of screws. There are ways around having to remove the appearance of threads completely while saving the file size and that’s done by adding the thread cosmetic appearance. This is accomplished by locating the appearance tab and grabbing and applying the thread to the face that normally has them. You can adjust this appearance to give it either a finer look or a more coarse look.

Figure 2: Screw without Threads

Tips and Tricks

Similar to the designing with VR in mind section, there are a lot of little things that can be done to an overall model to give it a great look for viewing in virtual reality. One thing is playing with appearances. This is more applicable for virtual reality software that is used with SolidWorks models. SolidWorks provides a wide variety of appearances that can help create stunning models without having to compromise on total file size. They have items from different styles of wood, metal finishes, glass, and miscellaneous items like grass and brick. These are both quick and easy to use that will change the components immensely giving them a nice look while in the virtual world.

Figure 3: Appearance Tab

Another tip is to remove items that may not be essential to get the overall idea of what the goal of the assembly is. Things like nuts and bolts are nice to have and view in a large assembly, but these are not necessarily needed to get a good picture of the intention of the model being viewed. One recommendation is when the assembly is at a good point with little to no more changes that need to be made is to save off a copy, remove components that aren’t essential, and apply more of the appearances to this assembly. This way helps to eliminate the possibility of moving or deleting items that may need to be seen in the other assembly.

Saving in Different Formats

Currently, at Perception Engineering, the software we are using for sending our models into the virtual reality world is DEMO3DVR from the Emulate3D group. Saving these file types is a very easy process because when the software is downloaded, it will automatically add the file extension in the save as type option. This file extension is *.raw3d.

Figure 4: Saving in the Demo3DVR Format

There are two major things that can be done with these files. One is it can now be sent to various people who have this same software or app and they will be able to view the file with virtual reality without access to the part files. There is also a Demo3D app in the Microsoft Store. This will allow for viewing files saved in the *.raw3d format without needing a SolidWorks license. This will help prevent the possibility of files being corrupted or updated incorrectly without the original creator making the changes and resaving them off to be viewed again. The second things that *.raw3d files can do are be viewed on a smartphone! These file types can be opened in the Demo3D mobile app to view in a device like the Google Cardboard or other similar VR viewers. This is a free viewer that can be downloaded in either the IOS App Store or Google Play Store.

Figure 5: Demo3D App

That’s all for now! Please subscribe to our E-mail list to stay up to date with the latest blog postings on Virtual Reality. 

Written By: 

Augmented Reality eDrawings

Augmented Reality with eDrawings

Imagine being able to take a CAD model from SolidWorks and view it on a mobile device in real time with real objects. What seemed to be impossible is quite real and easy to do!

What is Augmented Reality

Augmented reality, or AR, is technology that uses a computer-generated image in combination with the users view in the real world creating an item that can be seen next to real items. A couple of well-known apps that have brought this technology to the mainstream have been Pokémon Go and Snapchat. Both apps have been able to take their created content and allow the user to view them in day to day life with the users given surroundings.

Software

The software we have been using at Perception Engineering to view our created CAD models is eDrawings. This app is available for download in both the iOS app store and the Google Play store, however, the AR will only work for iOS currently. There are two different version: eDrawings for $1.99 and eDrawings Pro for $9.99. From what I’ve seen reading and learning about these softwares, there isn’t much of a difference, on the AR side at least, between the two. One thing that the Pro version can do is allow the user to view cross sections of the imported models inside and outside of the AR mode.  


Figure 1: eDrawings Apps

Setting up Files and Using the Software

We will be mainly be going through the step-by-step process of taking a SolidWorks part/assembly file and opening it in AR with the eDrawings app. The steps for importing an EASM or STEP will be very similar with the only difference being the file types.

The first step is to get the file to view in AR on your tablet or mobile device. This is accomplished by emailing the files to the device.

Figure 2: Emailing Part File

These files can either be downloaded and saved to the phone or they can be opened directly into the eDrawings app. For this example, we won’t download and save the file.

Figure 3: Opening Window

When selected to “Copy to eDrawings”, it will open the file directly into the eDrawings app!

Figure 4: Part in eDrawings App

Once the file is on the tablet or mobile device, the next step is to acquire the QR code and print it. This is done using the app by opening the part in the app, selecting AR from the menu, and choosing the “Get Marker” option. This will open the QR code and prompt the user to input an email address. This QR code is not unique from part to part, the software determines which file to show in AR based on which part is open in the app.

Figure 5: QR Code

Now it’s as simple as pointing the QR code on the screen to the printed off code. The model can be spun around using one finger and panned on the screen using two fingers. The model will also come in with a 1:1 scale based on the size of the QR code.

Figure 6: Viewing Model in AR

Tips and Tricks

There are a couple of little tips and tricks with using this software that can aid in having an overall better experience. The first one is manipulating some of the components inserted if they’re in an assembly. This software allows the ability to either hide or make the component transparent if a better, clearer view is desired. This is done by selecting the pop-out manager highlighted in Figure 7. At the bottom right corner of the screen are to make selected components either hidden/shown or solid/transparent. Simply select which option to apply and then select the component for an instant update. Components can either be selected in the feature tree flyout or on the assembly.

Figure 7: Hide/Show and Transparent/Solid Options

The next tip is cleaning up the user interface for a better view of the augmented model. The app can appear cluttered at first but simplifying and hiding all the options is a click away. Highlighted in Figure 8, simply select this expand/compress option and all the information will be hidden except the model and the option to bring back the information.

Figure 8: Simplified Interface

Issues

With this technology still being new, there are still some bugs and issues that will become more and more noticeable while using the software. One issue that will become obvious is the file size can’t be too large. If it ends up being too large, there will be a lot of stutter points when trying to rotate or pan the model. There is also the possibility of the app crashing because it can’t handle all the data/information being imported. This can be adjusted some by either defeaturing the components or removing some of the unnecessary components. Unnecessary components to the overall structure being things like nuts and bolts.

One other issue is the model when it’s inserted being too large. Some tests were done changing the size of the QR code, but some items still came in too massive to where it was impossible to see any portion. The only solution to this has been trying to adjust the scale immediately after locating the QR code. That is done by selecting the option under the AR button (highlighted in Figure 9) and manually typing in the scaled percent to try and fit in the view.

Figure 9: Scaling Option

Conclusion

In summation, this a fun and useful app to have! We here at Perception Engineering have been taking some of the different models we’ve worked on in the past and viewing them with this eDrawings app. Though it may seem limited in what we can do with this app, it’s only the beginning of the changes coming with new technology.

Written By:

SolidWorks: Part Configurations

Part Configurations

Often customers will want to view multiple configurations of the same part to see which they like best. Instead of creating four or five new part files to show the customer, it is much easier to create each version of the same part with the configurations manager tab.

Configurations

Within the configurations tab on the feature manager tree, right click on the Part and select Add Configuration.


Figure 1: Configuration tab location

Organize Configurations

Each configuration should have its own unique name to quickly distinguish between each configuration. This will help distinguish each configuration within assemblies and drawings to ensure the correct model is chosen.

Figure 2: Configuration Name

The saved configurations will appear in a pop-down menu within assemblies and drawings as seen below. Simply click on the part and the option to choose between each configuration will appear. Keeping simple and descriptive names will be the best option for configuration models.

Figure 3: Pop-down Menu

Modifications to Configurations

The feature tree model gives the option to suppress and unsuppressed features. Each configuration will be slightly different which means some features will need to be suppressed and others unsuppressed depending on the design intent. The default configuration should be the original design before modifications are incorporated.

Default:

Figure 4: Default Bracket

Large Mount:

Figure 5: Large Bracket

Small Mount:

Figure 6: Small Bracket

The reason each configuration has its own hole wizard feature is to ensure it has no relation to any other configurations. If bracket were to have only one clearance hole, then all three configurations will be identical; hence the need for three separate hole clearances.

Stay up to Date

Thanks for reading our blogs, if you enjoy the content please subscribe to our weekly blog postings. Perception Engineering stays up to date with the latest technologies and techniques and is happy to help answer any questions you may have.

Written By:

Engineering Co-Op at Perception Engineering

Engineering Co-Op

The first step into the real world of Engineering. The day I had been waiting for since my first day of college classes. A chance to apply the hours and hours of studying I had devoted over the past few years. Time for all my hard work to pay off. My engineering co-op experience at Perception Engineering.

Before college, I wasn’t exposed much to any engineering experience. We didn’t have any drafting or CAD classes in my high school, so when I started my engineering classes, it was all completely new information. As I was deciding on what major to pursue, I spoke to more and more people in the engineering field and almost all of them had something similar to say. It’s not all about the classes you take, it’s about the experience you get as well. After learning about Grand Valley State University’s Co-op program, that was just about enough to make my decision then and there. After three years of stress filled and coffee-fueled late nights, my time had finally come. It was time for me to start my co-op.

As I searched for jobs, I realized just how broad mechanical engineering is. I had never thought about what field I wanted to focus on. Then I found it. Scrolling through job postings on Grand Valley’s job search site, Perception Engineering, LLC. After looking into the company more, I learned of their contracting work, which was perfect, as I would get to see and work on projects from many industries. I applied as soon as I could, and after a couple interviews, was thrilled when I received a confirmation e-mail.

As my first co-op rotation is coming to an end, I’m happy to say it was a truly wonderful experience. Right away, after my training of course, I was given responsibility. They had just begun integrating SolidWorks PDM, and I was put in charge of learning the ins and outs of the software, writing the standards document for the company and helping the team through the implementation process. Within a few weeks, I was even given the opportunity to work on a project with a client, updating an invention they had worked with Perception on in the past. With PE being a younger company, they are rapidly growing and making changes. Even as a brand-new employee I was brought into the growth and changes of the company, making me feel even more at home. Overall, it was a great learning experience and gave me an opportunity to experience growth in my design skills, team collaboration skills, communication skills, and more. I look forward to what my next two rotations have in store.


That’s all for now! I hope you enjoyed hearing my story. If you would like to hear more about my story or have questions, connect with me on LinkedIn and send me a message. You can also sign up for our e-mail list to keep up with information on the company.

Written By: 

Perception Engineering 5-Year Celebration

Perception Engineering 5-Year Celebration

Thanks to everyone who attended Perception Engineering’s five-year celebration! The company that started in a basement with a single 3D printer back in 2013 has now grown to service the needs of manufacturers, inventors, and automation companies from all over West Michigan and the rest of the U.S.


PICTURE


The five-year celebration at Perception Engineering brought past and current customers together to meet the PE team and see how their company’s contracts helped turn PE into the contracting service it is today. Turning PE’s office into a networking event truly put the company’s name in the limelight.

Perception Engineering supplied desserts, wood-fired pizzas, and drinks during the summer heat. The thick, melted cheese from pizzas may have stolen the show, but the virtual reality came in a close second.

The services Perception Engineering provides were showcased throughout our office to spark conversation with not only the PE team but other like-minded people in the area. During the open house, project engineers offered tours that described in detail virtual reality, 3D printing, design processes, and even laser cutting. If any of the services sparked someone’s interest, they could sign up for more information and possibly a free demo for their company.

Again, thanks to everyone who came out! We look forward to our next company milestone marker.

Written By: 

Amazon Part Finder

Amazon Part Finder

Do you have a random screw, washer, or nut laying around and have no idea how to identify what it is? You’re in luck with Amazon’s new Part Finder option within the Amazon app! Amazon now has the technology to scan whichever type of desired fastener, provide accurate sizing of it, and provide links on their app so you can purchase these! This blog will highlight how to locate this function within the app and how to use it.

Locating Part Finder

Locating the app is actually easier than what some people may believe because it is actually located in the regular Amazon app. First, download the Amazon app from the iOS App Store or the Google Play store for Android. Once the app is downloaded, select the camera next to the search bar to access the Part Finder function and many other useful options. Access to the camera will also need to be allowed to use these options.


Figure 1: Camera Location

Once you’ve selected the camera option and have allowed access, Amazon’s default function that appears in the Product Search option. To locate Part Finder, select the see more option at the bottom of the screen and select the icon of a screw with the Part Finder text below it.

Figure 2: Locating Part Finder Option

How to use it

Now that the Part Finder option has been located, the next step is to try it out! Along with the app, there are a couple of things that will be needed. You will need a fastener, washer, or nut to be measured, a white surface (a piece of white paper will work), and a penny. The white surface helps the camera get a clear picture or the threads and the penny is for reference to get an accurate size of the object. Once those are located, take a single object, we’re using a bolt for example, and place it next to the penny on the white surface.

Figure 3: Example Bolt with Penny

The next step, with both the penny and object being measured in the frame, hold the phone level and steady. If you’re unsure if the phone is level, try and match the white circle into the center of the intersecting lines (the lines will turn green and the countdown will begin once the phone is level).

 Figure 4: Measuring the Object

The app will now start to analyze the photo and once that’s complete, it will prompt the user for some extra inputs. The user will need to select a few options: which type of screw it is, the head style, and the drive type.

 Figure 5: Scanned Photo and Extra Inputs

After the parameters have been set, select the See Search Results on the page in the bottom-right corner and Amazon will open what they believe to be the correct screw within the app. Depending on how the photo was analyzed, Amazon will provide the length and the diameter of the object (different items appear at the top from when measuring a nut, washer, or bolt). The app will also provide links to the measured objects that can be purchased directly from Amazon.

 Figure 6: End Result

Conclusion

Even though this technology is still fairly new, it’s improving and only becoming more useful and smarter with each released update. The only complaint with this current version is that it can’t identify threads which would be very useful. Maybe in future updates, we can have this option along with other quality of life updates!

Written By:

SolidWorks: Linear, Circular, and Curve Driven Pattern Commands

Pattern commands are a designer’s best friend in terms of replication and improving overall efficiency. Linear, Circular, and Curve driven patterns are all common commands used by the everyday CAD user. This blog will guide you through using these three pattern features in SolidWorks and provide context as to when they can be used to simplify the modeling process.

Linear Driven Pattern

The Linear Pattern Command is used to drive features, faces, or bodies in a linear direction.  This feature helps save time by cutting down the repetitive movements of adding a bunch of holes or other forms of geometry. In Figure 1, the location of the linear pattern command in addition to the curve and circular driven pattern commands are shown.


Figure 1: Command Locations

Using an existing hole wizard feature, the linear pattern will systematically generate identical holes across the model. The first step in executing a linear pattern is to select a desired feature in the Features and Faces selection box or by preselecting prior to hitting the Linear Pattern Command (Figure 2).

Figure 2: Selecting the Feature

After selecting “3/4-10 Tapped Hole1” feature in this case, the dimensions defined in the feature appear and can be used to aid in the patterning process (Figure 3). The next step in the command manager is selecting up to two linear pattern directions. For this example, the two 4.00 dimensions were used to define two pattern directions, as they are in the desired linear direction to make an equally spaced square hole pattern. Additionally, there is also the option to select edges, faces, planes, and other geometry in the preferred linear direction.

Figure 3: Setting Direction

Now that the directions are set, the next step is to fill out the necessary parameters for each direction required to make the pattern. The first parameter is the number of instances. As seen in Figure 4, the desired “3/4-10 Tapped Hole1” hole feature pattern will add 2 instances in both directions creating a 2×2 square. The distance in both the vertical and horizontal direction was set to 12 inches in order to keep the pattern centered to the square piece.

Figure 4: Hole Instances

If the desired pattern direction is oriented incorrectly, the opposing arrows button (highlighted) next to the selection box flips the direction relative to the reference selected. Figure 4 also shows a pattern preview on the part (enabled from the checkbox on the bottom of the command manager), which will help verify the orientation and intended pattern direction.

Lastly, as seen in Figure 5 the green check mark in the top left corner of the manager will execute the command and reveal the pattern on the model.

Figure 5: Final Check

Curve Driven Pattern

In the next example, the Curved Pattern Command is used to execute a hole pattern consistently about the outer curvature of a cam (see Figure 6). The setup and command manager layout are nearly identical to the linear pattern and the steps are listed below as follows:

– Select the feature/face/body to pattern

– Select a curved reference (this can be an open or closed curved geometry)

-Adjust the direction, spacing, and number of instances in the desired pattern

-Preview the pattern and then execute.

In this curve driven pattern example (see Figure 6), I selected a hole feature, the edge of the cam as the Direction 1 reference and adjusted my instances and spacing to 4 and 0.425 correspondingly. As with the linear pattern, up to two different directions can be added.

Figure 6: Curved Pattern About an Edge  

Circular Driven Pattern

The Circular Pattern Command is an excellent tool used to replicate features, faces, or bodies in a rotational manner about an axis. In this example (see Figure 7), I show how to replicate an extruded cut with filleted corners about a round piece of tubing.

Figure 7: Circular Pattern Overview

Similar to the linear and curve driven pattern, the first step is selecting a feature (or features in this case) to replicate in the Features and Faces selection box or by preselecting prior to hitting the pattern command.

Figure 8: Selecting Features and Faces

After the cut-extrude and fillet are both selected, the intended rotation axis is selected in the top selection box under Direction 1 in the command manager (see Figure 9). The rotation direction can be toggled using the arrow button to the left of the selection box. The next step is to select the degree of spacing and number of instances.

Figure 9: Circular Pattern Parameters & Preview

In this example, since the original extruded cut through both sides of the pipe, the pattern only needed to rotate the feature 180 degrees instead of 360 to complete the cut all the way around, so I chose a 45-degree spacing and 4 instances to complete the pattern across the tube. As with other pattern features discussed, up to two directions can be selected.

That’s all for now! You now know the basics in Linear, Curved, and Circular Patterns. If you like the content or have questions, signup for our email list to stay in the loop for solutions or weekly content.

Written By:

SolidWorks: Feature Mirroring

Feature Mirroring

While creating parts in SolidWorks, efficiency and accuracy are essential when working on a project for a client! For projects that are repeatable, Perception Engineering saves time by applying the mirror feature command if models are symmetrical. SolidWorks is equipped with a few different types of mirroring commands: sketch mirroring, part mirroring, and feature mirroring. For this blog the focus will be on feature mirroring utilizing the given top, right, and front planes to create feature mirrors!

Getting started

The mirror icon is located on the feature command bar as seen in Figure 1.


Figure 1: Mirror Icon

To ensure proper use of this feature, be sure an extrusion is modeled. This feature will mirror the extrusion over a desired plane. A simple exercise to do is to create a feature on the front plane and have it share one edge with the right plane as shown in Figure 2. This feature works the same no matter how complex the model, as long as it has one shared edge with a plane.

Figure 2: Highlighted shared the edge with a plane

Plane and Feature Selection

Now that you have a feature ready to be mirrored, such as an extrusion. Select the mirror icon on the features toolbar. The first selection box asks you to pick a mirror face/plane. Select the right plane as the mirror plane, then the right plane will appear in the selection box, as seen in Figure 3. Now, all that needs to be done is select the feature that is to be mirrored. The second selection box asks for a selection of a feature to be mirrored. It is possible to click directly on the feature itself to select it, or it can be selected on the feature manager tree. Once the feature that is desired to be mirrored is selected it will appear in the selection box.

Figure 3: Property manager

There is also an option to choose a 2D face to mirror instead of a 3D feature. By using this option, you cannot mirror bodies but only surface face features such as holes, surface cuts, and other features that are placed on an already created 3D body. To do this correctly, the face must be mirrored onto an already created feature, the face cannot be mirrored into blank space to become its own feature.

Figure 4: Faces to Mirror

The ability to mirror faces can be very helpful. If there are multiple complicated features on an extrusion body, rather than draw out every one they can simply be mirrored to the desired locations.                                                                                                       

Preview Selection

There is an option to preview the mirror at the bottom of the property manager, as seen in Figure 5. If the partial preview is selected a 2D highlighted copy of the newly mirrored feature will show across the right plane from the original feature. If the full preview is selected it will highlight both features showing that the outcome will be one combined body with an extrusion depth shown in 3D. All there is left to do now is click the green check at the top of the property manager and mirror the feature!

Figure 5: Preview modes

Reasons to Mirror

Mirroring is a simple and easy way to save time when modeling parts. Mirroring is used primarily to create perfect symmetry for a part, this way you only need to make half of the part in only half the time! Mirroring can also be used on more than just part bodies, it can be used on smaller extruded features, cuts, and various shapes that appear symmetrically throughout the part.

Figure 6: Fully Mirrored

The team here at Perception Engineering use the mirror command to save time when the part model is similar in geometry. Both features and sketches are used in the modeling phase regularly so having the models orientated symmetric along the top, right, and the front plane will save some time.  

Thanks for tuning in our weekly blog! Please subscribe to our weekly postings and feel free to ask us any questions or concerns and our team will get back to you. 

Written By:

SolidWorks: Introduction to PDM

SolidWorks Product Data Management (PDM)

Team Collaboration, you may love it, you may hate it, but it is often necessary when it comes to coordinating projects among teams. There are many tools and applications designed to go about streamlining this process, however, there are better choices for specific purposes. Here at Perception Engineering much of our work is design work done through SolidWorks. To make our team project collaboration more efficient we have implemented SolidWorks PDM. This blog will go over what that is, some of the functions we have found particularly useful, and how to set up your first vault.

Introduction to SolidWorks PDM

SolidWorks PDM stands for SolidWorks Product Data Management. It is an add-on package that provides you with the tools to manage and coordinate your files while being very closely integrated with SolidWorks. It allows you to create file vaults within your computer’s file explorer that allows each team member, that is appointed access, to check files in and out of on their own computers. Once a vault is created, files can be uploaded and organized into folders within the vault. This program is especially useful for SolidWorks. Team members can check out design files, make their changes, and check them back in. This allows for collaboration on a part without working on the same computer. There are also features such as folder and file data cards which allow you to change your part properties from the file browser; also making it possible to change multiple parts’ properties at once. You can also create workflows to streamline the approval process of a project. With these, you can designate team leaders to oversee the status of a document submitted for approval which will automatically update revisions of a SolidWorks file. More in-depth walkthroughs of these features will be included in future blogs.

Starting a New SolidWorks PDM Vault

The first step to creating a vault within PDM is to open the Administration application, which will most likely be found in your programs file on your computer.


Figure 1: Administration Application Icon

Next, you must add the server that your team plans to work on. This can be done by selecting “File” → “Add Server” and following the prompts. Once this is complete you are ready to add your first vault. To do this you must use the drop-down menu for “SOLIDWORKS PDM Administration” and right click on the option that has your server name and select “Create new vault…”.

Figure 2: Location of Vault Creation

This selection will bring you to the “Create New Vault” wizard. This will walk you through the rest of the steps needed such as selecting the type of vault, naming your vault, and where to place it. Once you reach the “Choose database” page, if your server is not an option on the drop-down menu make sure to type in your server name in the edit box provided.

Figure 3: Database Entry in Vault Wizard

You will then continue through the wizard, choosing the settings that you prefer. Once you reach the “Configure vault” page, it is suggested that you use the predefined configuration, “SOLIDWORKS Quick Start”. Carry out the last few pages of the wizard, select finish and there you have it! Your first SolidWorks PDM vault.

That’s all for now! You now know how to set up your own SolidWorks PDM file vault. If you like the content or have questions, sign up for our email list to stay in the loop for solutions or weekly content.

Written By: 

SolidWorks: Exploded Views

Exploding an assembly view in SolidWorks can make all the difference when trying to show every component involved in the making. Instead of showing multiple views and angles, one view can be used to show all components. A well done exploded view will also help in the understanding of how the entire assembly fits together. Exploded views are used in almost every industry when it comes to explaining a product and how it works. Knowing how to use the exploded view feature is a crucial key feature and will be finishing touch needed when showing an assembly.  

Feature/Icon Location

Exploded views are only able to be performed on an assembly, not a single part. Therefore, the exploded view icon is only located inside of an assembly file. To reach the icon it can either be found on the assembly tab toolbar or can be created by going under the configurations tab and right clicking on the assembly icon and creating a new exploded view. Both locations are shown below in Figure 1.


Figure 1: Feature/Icon locations

Exploded View Feature Manager

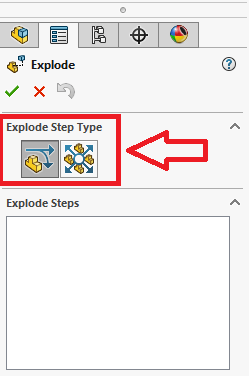
There are two types of exploded view step types to choose from, as seen in Figure 2. There is a regular step and radial step. By choosing regular step, objects selected, being one or multiple, will all move in the same direction with each other. The radial step type is mostly used on parts that are in a circular type pattern. When using a radial step, all parts chosen will move away from each other from a common center point when dragged. Almost as if they are lying on a circle that’s radius is expanding. The focus of this blog will stay on regular step exploding since this is the most common type to be used.

Figure 2: Explode step types

Exploded part selection

Exploding an assembly using regular step type is quite simple. After choosing the step type the components that are desired to be moved are selected and dragged, this can be one part or multiple. If multiple parts are highlighted at the same time they will all move in the same direction when pulled. The direction is chosen by the user. After clicking on a part to be moved an origin point is shown on the selected part showing the possible direction and rotation options. Simply click and hold on the arrow in the direction that is desired and drag the mouse. After the components are moved an “exploded step 1” will appear in the exploded steps view box inside the feature manager. From here previous steps can be edited by right-clicking on them. An example of these steps is shown in Figure 3 below.

Figure 3: Explode step 1

Under the part selection box in the feature manager, there is the option to input set values for how far the part will move and what rotation angle can be put on the selected part. These can be used for exact spacing of exploded parts if it is needed. There is also an explode direction selection box located below the part selection box, as shown in Figure 4. In this selection box, the direction of the exploded step can be changed to match a face or axial direction of another part located inside of the assembly. This can help in the overall flow of the exploded view, giving it a cleanly spaced look when the exploded view is finished.  

Figure 4: Set value locations & Explode direction change

Other Exploded Options

Located at the bottom of the exploded view feature manager are a few other options to choose from when exploding an assembly. A very helpful one is the option to turn off and on select subassembly parts. This allows you to move a subassembly as one whole part or one part of the subassembly at a time. This option can only be applied if there is a subassembly inside the assembly that is being exploded. There is also a button that gives the option to reuse a subassembly explosion. If a subassembly being used has already previously been exploded, by clicking this button that exploded state will be shown and it will not have to be redone! These options are shown in Figure 5.

Figure 5: Subassembly explode options

After Exploding The Assembly

Once the assembly has been fully exploded it can be quite hard to tell just exactly where everything has come from and where everything goes back to. Especially in an assembly with a large number of parts. There is an option to add smart explode lines to help with this. These lines, when added in, follow the path that every part was dragged from all the way back to its origin. This helps greatly in showing how an assembly is put together. However, if there are a large number of parts the lines can become cluttered and overwhelming, this option can be left up to personal preference. In Figure 6 below a final exploded assembly is shown with smart lines as well as the location of where to add in the smart lines. 

Figure 6: Full exploded view with smart lines

Things to look out for

When exploding an assembly, make sure all components can be seen from one view. Typically for exploded assemblies, the viewpoint is from an isometric view. Also, when exploding an assembly, after clicking off a part, the assembly may collapse and go back to its original state. You do not have to redo the entire exploded assembly. Simply go back to the configurations tab and under the exploded view configuration, right click and hit edit feature, the assembly will re-explode.

Written By: