Amazon Part Finder

Amazon Part Finder

Do you have a random screw, washer, or nut laying around and have no idea how to identify what it is? You’re in luck with Amazon’s new Part Finder option within the Amazon app! Amazon now has the technology to scan whichever type of desired fastener, provide accurate sizing of it, and provide links on their app so you can purchase these! This blog will highlight how to locate this function within the app and how to use it.

Locating Part Finder

Locating the app is actually easier than what some people may believe because it is actually located in the regular Amazon app. First, download the Amazon app from the iOS App Store or the Google Play store for Android. Once the app is downloaded, select the camera next to the search bar to access the Part Finder function and many other useful options. Access to the camera will also need to be allowed to use these options.


Figure 1: Camera Location

Once you’ve selected the camera option and have allowed access, Amazon’s default function that appears in the Product Search option. To locate Part Finder, select the see more option at the bottom of the screen and select the icon of a screw with the Part Finder text below it.

Figure 2: Locating Part Finder Option

How to use it

Now that the Part Finder option has been located, the next step is to try it out! Along with the app, there are a couple of things that will be needed. You will need a fastener, washer, or nut to be measured, a white surface (a piece of white paper will work), and a penny. The white surface helps the camera get a clear picture or the threads and the penny is for reference to get an accurate size of the object. Once those are located, take a single object, we’re using a bolt for example, and place it next to the penny on the white surface.

Figure 3: Example Bolt with Penny

The next step, with both the penny and object being measured in the frame, hold the phone level and steady. If you’re unsure if the phone is level, try and match the white circle into the center of the intersecting lines (the lines will turn green and the countdown will begin once the phone is level).

 Figure 4: Measuring the Object

The app will now start to analyze the photo and once that’s complete, it will prompt the user for some extra inputs. The user will need to select a few options: which type of screw it is, the head style, and the drive type.

 Figure 5: Scanned Photo and Extra Inputs

After the parameters have been set, select the See Search Results on the page in the bottom-right corner and Amazon will open what they believe to be the correct screw within the app. Depending on how the photo was analyzed, Amazon will provide the length and the diameter of the object (different items appear at the top from when measuring a nut, washer, or bolt). The app will also provide links to the measured objects that can be purchased directly from Amazon.

 Figure 6: End Result

Conclusion

Even though this technology is still fairly new, it’s improving and only becoming more useful and smarter with each released update. The only complaint with this current version is that it can’t identify threads which would be very useful. Maybe in future updates, we can have this option along with other quality of life updates!

Written By:

SolidWorks: Linear, Circular, and Curve Driven Pattern Commands

Pattern commands are a designer’s best friend in terms of replication and improving overall efficiency. Linear, Circular, and Curve driven patterns are all common commands used by the everyday CAD user. This blog will guide you through using these three pattern features in SolidWorks and provide context as to when they can be used to simplify the modeling process.

Linear Driven Pattern

The Linear Pattern Command is used to drive features, faces, or bodies in a linear direction.  This feature helps save time by cutting down the repetitive movements of adding a bunch of holes or other forms of geometry. In Figure 1, the location of the linear pattern command in addition to the curve and circular driven pattern commands are shown.


Figure 1: Command Locations

Using an existing hole wizard feature, the linear pattern will systematically generate identical holes across the model. The first step in executing a linear pattern is to select a desired feature in the Features and Faces selection box or by preselecting prior to hitting the Linear Pattern Command (Figure 2).

Figure 2: Selecting the Feature

After selecting “3/4-10 Tapped Hole1” feature in this case, the dimensions defined in the feature appear and can be used to aid in the patterning process (Figure 3). The next step in the command manager is selecting up to two linear pattern directions. For this example, the two 4.00 dimensions were used to define two pattern directions, as they are in the desired linear direction to make an equally spaced square hole pattern. Additionally, there is also the option to select edges, faces, planes, and other geometry in the preferred linear direction.

Figure 3: Setting Direction

Now that the directions are set, the next step is to fill out the necessary parameters for each direction required to make the pattern. The first parameter is the number of instances. As seen in Figure 4, the desired “3/4-10 Tapped Hole1” hole feature pattern will add 2 instances in both directions creating a 2×2 square. The distance in both the vertical and horizontal direction was set to 12 inches in order to keep the pattern centered to the square piece.

Figure 4: Hole Instances

If the desired pattern direction is oriented incorrectly, the opposing arrows button (highlighted) next to the selection box flips the direction relative to the reference selected. Figure 4 also shows a pattern preview on the part (enabled from the checkbox on the bottom of the command manager), which will help verify the orientation and intended pattern direction.

Lastly, as seen in Figure 5 the green check mark in the top left corner of the manager will execute the command and reveal the pattern on the model.

Figure 5: Final Check

Curve Driven Pattern

In the next example, the Curved Pattern Command is used to execute a hole pattern consistently about the outer curvature of a cam (see Figure 6). The setup and command manager layout are nearly identical to the linear pattern and the steps are listed below as follows:

– Select the feature/face/body to pattern

– Select a curved reference (this can be an open or closed curved geometry)

-Adjust the direction, spacing, and number of instances in the desired pattern

-Preview the pattern and then execute.

In this curve driven pattern example (see Figure 6), I selected a hole feature, the edge of the cam as the Direction 1 reference and adjusted my instances and spacing to 4 and 0.425 correspondingly. As with the linear pattern, up to two different directions can be added.

Figure 6: Curved Pattern About an Edge  

Circular Driven Pattern

The Circular Pattern Command is an excellent tool used to replicate features, faces, or bodies in a rotational manner about an axis. In this example (see Figure 7), I show how to replicate an extruded cut with filleted corners about a round piece of tubing.

Figure 7: Circular Pattern Overview

Similar to the linear and curve driven pattern, the first step is selecting a feature (or features in this case) to replicate in the Features and Faces selection box or by preselecting prior to hitting the pattern command.

Figure 8: Selecting Features and Faces

After the cut-extrude and fillet are both selected, the intended rotation axis is selected in the top selection box under Direction 1 in the command manager (see Figure 9). The rotation direction can be toggled using the arrow button to the left of the selection box. The next step is to select the degree of spacing and number of instances.

Figure 9: Circular Pattern Parameters & Preview

In this example, since the original extruded cut through both sides of the pipe, the pattern only needed to rotate the feature 180 degrees instead of 360 to complete the cut all the way around, so I chose a 45-degree spacing and 4 instances to complete the pattern across the tube. As with other pattern features discussed, up to two directions can be selected.

That’s all for now! You now know the basics in Linear, Curved, and Circular Patterns. If you like the content or have questions, signup for our email list to stay in the loop for solutions or weekly content.

Written By:

SolidWorks: Feature Mirroring

Feature Mirroring

While creating parts in SolidWorks, efficiency and accuracy are essential when working on a project for a client! For projects that are repeatable, Perception Engineering saves time by applying the mirror feature command if models are symmetrical. SolidWorks is equipped with a few different types of mirroring commands: sketch mirroring, part mirroring, and feature mirroring. For this blog the focus will be on feature mirroring utilizing the given top, right, and front planes to create feature mirrors!

Getting started

The mirror icon is located on the feature command bar as seen in Figure 1.


Figure 1: Mirror Icon

To ensure proper use of this feature, be sure an extrusion is modeled. This feature will mirror the extrusion over a desired plane. A simple exercise to do is to create a feature on the front plane and have it share one edge with the right plane as shown in Figure 2. This feature works the same no matter how complex the model, as long as it has one shared edge with a plane.

Figure 2: Highlighted shared the edge with a plane

Plane and Feature Selection

Now that you have a feature ready to be mirrored, such as an extrusion. Select the mirror icon on the features toolbar. The first selection box asks you to pick a mirror face/plane. Select the right plane as the mirror plane, then the right plane will appear in the selection box, as seen in Figure 3. Now, all that needs to be done is select the feature that is to be mirrored. The second selection box asks for a selection of a feature to be mirrored. It is possible to click directly on the feature itself to select it, or it can be selected on the feature manager tree. Once the feature that is desired to be mirrored is selected it will appear in the selection box.

Figure 3: Property manager

There is also an option to choose a 2D face to mirror instead of a 3D feature. By using this option, you cannot mirror bodies but only surface face features such as holes, surface cuts, and other features that are placed on an already created 3D body. To do this correctly, the face must be mirrored onto an already created feature, the face cannot be mirrored into blank space to become its own feature.

Figure 4: Faces to Mirror

The ability to mirror faces can be very helpful. If there are multiple complicated features on an extrusion body, rather than draw out every one they can simply be mirrored to the desired locations.                                                                                                       

Preview Selection

There is an option to preview the mirror at the bottom of the property manager, as seen in Figure 5. If the partial preview is selected a 2D highlighted copy of the newly mirrored feature will show across the right plane from the original feature. If the full preview is selected it will highlight both features showing that the outcome will be one combined body with an extrusion depth shown in 3D. All there is left to do now is click the green check at the top of the property manager and mirror the feature!

Figure 5: Preview modes

Reasons to Mirror

Mirroring is a simple and easy way to save time when modeling parts. Mirroring is used primarily to create perfect symmetry for a part, this way you only need to make half of the part in only half the time! Mirroring can also be used on more than just part bodies, it can be used on smaller extruded features, cuts, and various shapes that appear symmetrically throughout the part.

Figure 6: Fully Mirrored

The team here at Perception Engineering use the mirror command to save time when the part model is similar in geometry. Both features and sketches are used in the modeling phase regularly so having the models orientated symmetric along the top, right, and the front plane will save some time.  

Thanks for tuning in our weekly blog! Please subscribe to our weekly postings and feel free to ask us any questions or concerns and our team will get back to you. 

Written By:

SolidWorks: Introduction to PDM

SolidWorks Product Data Management (PDM)

Team Collaboration, you may love it, you may hate it, but it is often necessary when it comes to coordinating projects among teams. There are many tools and applications designed to go about streamlining this process, however, there are better choices for specific purposes. Here at Perception Engineering much of our work is design work done through SolidWorks. To make our team project collaboration more efficient we have implemented SolidWorks PDM. This blog will go over what that is, some of the functions we have found particularly useful, and how to set up your first vault.

Introduction to SolidWorks PDM

SolidWorks PDM stands for SolidWorks Product Data Management. It is an add-on package that provides you with the tools to manage and coordinate your files while being very closely integrated with SolidWorks. It allows you to create file vaults within your computer’s file explorer that allows each team member, that is appointed access, to check files in and out of on their own computers. Once a vault is created, files can be uploaded and organized into folders within the vault. This program is especially useful for SolidWorks. Team members can check out design files, make their changes, and check them back in. This allows for collaboration on a part without working on the same computer. There are also features such as folder and file data cards which allow you to change your part properties from the file browser; also making it possible to change multiple parts’ properties at once. You can also create workflows to streamline the approval process of a project. With these, you can designate team leaders to oversee the status of a document submitted for approval which will automatically update revisions of a SolidWorks file. More in-depth walkthroughs of these features will be included in future blogs.

Starting a New SolidWorks PDM Vault

The first step to creating a vault within PDM is to open the Administration application, which will most likely be found in your programs file on your computer.


Figure 1: Administration Application Icon

Next, you must add the server that your team plans to work on. This can be done by selecting “File” → “Add Server” and following the prompts. Once this is complete you are ready to add your first vault. To do this you must use the drop-down menu for “SOLIDWORKS PDM Administration” and right click on the option that has your server name and select “Create new vault…”.

Figure 2: Location of Vault Creation

This selection will bring you to the “Create New Vault” wizard. This will walk you through the rest of the steps needed such as selecting the type of vault, naming your vault, and where to place it. Once you reach the “Choose database” page, if your server is not an option on the drop-down menu make sure to type in your server name in the edit box provided.

Figure 3: Database Entry in Vault Wizard

You will then continue through the wizard, choosing the settings that you prefer. Once you reach the “Configure vault” page, it is suggested that you use the predefined configuration, “SOLIDWORKS Quick Start”. Carry out the last few pages of the wizard, select finish and there you have it! Your first SolidWorks PDM vault.

That’s all for now! You now know how to set up your own SolidWorks PDM file vault. If you like the content or have questions, sign up for our email list to stay in the loop for solutions or weekly content.

Written By: 

SolidWorks: Exploded Views

Exploding an assembly view in SolidWorks can make all the difference when trying to show every component involved in the making. Instead of showing multiple views and angles, one view can be used to show all components. A well done exploded view will also help in the understanding of how the entire assembly fits together. Exploded views are used in almost every industry when it comes to explaining a product and how it works. Knowing how to use the exploded view feature is a crucial key feature and will be finishing touch needed when showing an assembly.  

Feature/Icon Location

Exploded views are only able to be performed on an assembly, not a single part. Therefore, the exploded view icon is only located inside of an assembly file. To reach the icon it can either be found on the assembly tab toolbar or can be created by going under the configurations tab and right clicking on the assembly icon and creating a new exploded view. Both locations are shown below in Figure 1.


Figure 1: Feature/Icon locations

Exploded View Feature Manager

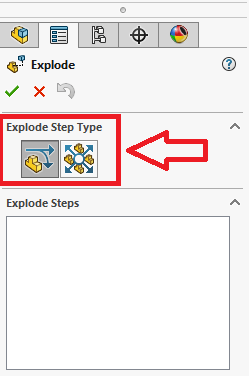
There are two types of exploded view step types to choose from, as seen in Figure 2. There is a regular step and radial step. By choosing regular step, objects selected, being one or multiple, will all move in the same direction with each other. The radial step type is mostly used on parts that are in a circular type pattern. When using a radial step, all parts chosen will move away from each other from a common center point when dragged. Almost as if they are lying on a circle that’s radius is expanding. The focus of this blog will stay on regular step exploding since this is the most common type to be used.

Figure 2: Explode step types

Exploded part selection

Exploding an assembly using regular step type is quite simple. After choosing the step type the components that are desired to be moved are selected and dragged, this can be one part or multiple. If multiple parts are highlighted at the same time they will all move in the same direction when pulled. The direction is chosen by the user. After clicking on a part to be moved an origin point is shown on the selected part showing the possible direction and rotation options. Simply click and hold on the arrow in the direction that is desired and drag the mouse. After the components are moved an “exploded step 1” will appear in the exploded steps view box inside the feature manager. From here previous steps can be edited by right-clicking on them. An example of these steps is shown in Figure 3 below.

Figure 3: Explode step 1

Under the part selection box in the feature manager, there is the option to input set values for how far the part will move and what rotation angle can be put on the selected part. These can be used for exact spacing of exploded parts if it is needed. There is also an explode direction selection box located below the part selection box, as shown in Figure 4. In this selection box, the direction of the exploded step can be changed to match a face or axial direction of another part located inside of the assembly. This can help in the overall flow of the exploded view, giving it a cleanly spaced look when the exploded view is finished.  

Figure 4: Set value locations & Explode direction change

Other Exploded Options

Located at the bottom of the exploded view feature manager are a few other options to choose from when exploding an assembly. A very helpful one is the option to turn off and on select subassembly parts. This allows you to move a subassembly as one whole part or one part of the subassembly at a time. This option can only be applied if there is a subassembly inside the assembly that is being exploded. There is also a button that gives the option to reuse a subassembly explosion. If a subassembly being used has already previously been exploded, by clicking this button that exploded state will be shown and it will not have to be redone! These options are shown in Figure 5.

Figure 5: Subassembly explode options

After Exploding The Assembly

Once the assembly has been fully exploded it can be quite hard to tell just exactly where everything has come from and where everything goes back to. Especially in an assembly with a large number of parts. There is an option to add smart explode lines to help with this. These lines, when added in, follow the path that every part was dragged from all the way back to its origin. This helps greatly in showing how an assembly is put together. However, if there are a large number of parts the lines can become cluttered and overwhelming, this option can be left up to personal preference. In Figure 6 below a final exploded assembly is shown with smart lines as well as the location of where to add in the smart lines. 

Figure 6: Full exploded view with smart lines

Things to look out for

When exploding an assembly, make sure all components can be seen from one view. Typically for exploded assemblies, the viewpoint is from an isometric view. Also, when exploding an assembly, after clicking off a part, the assembly may collapse and go back to its original state. You do not have to redo the entire exploded assembly. Simply go back to the configurations tab and under the exploded view configuration, right click and hit edit feature, the assembly will re-explode.

Written By:

SolidWorks: Swept Boss/Base Command

This blog will show three basic examples of how to use the Swept Boss/Base feature in SolidWorks. There are two main requirements to create a Swept Boss or Base: A closed profile and a path. This first example will show how to create a sweep using a circular profile and an open relatively linear path. Figure 1, below, shows the profile drawn on the front plane and the sweep path drawn on the top plane. It is important to make sure that the starting point of the path lies on the same plane as the profile. Also, notice how the center of the circle profile is centered on the start of my path. This ensures that the sweep will be centered to my profile; however, any location contained inside the profile, including the boundary, can be used to generate a sweep.


Figure 1: Profile and Path

Once your profile and sketch are defined, select the Swept Boss/Base command on the features tab as seen in Figure 2.

Figure 2: Swept Boss/Base Command

The command window will then appear on the left side of the screen. Click on the boxes under the Profile and Path section and select your profile and path sketches as seen in Figure 3. A preview of your sweep will appear to further verify your intended feature.

Figure 3: Command Manager & Execution

The green check mark on the top left of the command manager will execute the command and reveal the finished model as seen in Figure 4.

Figure 4: Example 1 Finished Model

This first example shows the basics of generating a sweep feature. Examples 2 and 3 dive into more complex geometry and some other capabilities of this command. Figure 5 shows the cross profile and the slot-shaped path used for the sweep in Example 2.

Figure 5: Example 2 Profile and Path

Selecting the Swept Boss/Base command and the two sketches above as the profile and path accordingly, Figure 6 shows the initial preview of the sweep. Expanding the options drop down in the command manager, as indicated by the red arrow in Figure 6, SolidWorks allows you to change the orientation of the profile along the sweep by assigning a profile twist. The profile twist can be specified by a twist value, direction vector, or by applying tangency to adjacent faces. In this example, a profile twist value of 720 degrees (also available in radians or revolutions) was set and can be seen in Figure 7.

Figure 6: Example 2 Command Manager and Preview

Figure 7: Assigning a Profile Twist

After hitting the green check, the resulting model from the sweep feature is shown in Figure 8.

Figure 8: Example 3 Model

This final example will cover how to setup and execute a sweep using guide curves. Guide curves in comparison to profile twist allow for a varying profile size along the path of the sweep. Figure 9 shows separate sketches of the square profile, line path, and the additional guide curve drawn on the same plane as the path. Make sure when adding a guide curve to a sweep that the pierce constraint is used to connect the start of the curve to the edge of the profile (see Figure 9). In utilizing guide curves, it is also crucial that profile of the sweep is not fully constrained otherwise the sweep will fail. In this example, the height of square profile is constrained but not the width.

Figure 9: Adding a Guide Curve Sketch

After sketching the profile, path, and guide curve on separate sketches, enter the Swept Boss/Base command manager and add in the profile and path designated in Figure 9 above. Select the guide curve drop down and, in the box, select the guide curve sketch from the feature tree (see Figure 10).  Since the width of the profile is not constrained, it can follow the guide curve as it is swept down the intended path. After executing the command, the resulting model is seen in Figure 11.

Figure 10: Adding a Guide Curve in the Command Manager

Figure 11: Example 3 Model

That’s all for now! You now know the basics of the Swept Boss/Base. If you like the content or have questions, signup for our email list to stay in the loop for solutions or weekly content.

Written By: 


Virtual Reality: How to Spec a VR Computer

Technology is growing and changing every day in the engineering world. To help keep up with these trends on the virtual reality side of things, having the right equipment is essential. This blog will go through some steps and some things to look out for when it comes to a virtual reality capable computer.

Introduction

With all the computer and laptop options, a single area listing minimum specs to run virtual reality is useful. This blog will hopefully help eliminate some of this confusion and help to test your computer to see that it’s ready to run the virtual reality. We will also show where to find the current specs for the laptop or desktop is used. Last will be some programs that can be downloaded and used to test your system for virtual reality and some computer recommendations based on experience and applications we have used at Perception Engineering.

Recommended Specs


For this blog, we will mainly be comparing the recommended specs for the HTC Vive, HTC Vive Pro, and the Oculus Rift. Both have similar recommended computer specs with some variation. There is some fluctuation in some areas and different hardware/software that can be used and still run virtual reality perfectly fine. These specs are taken from the headset manufacturers’ websites.

Figure 1: Recommended Specs

Below will be the listed links to these websites. Many of these websites will also include a separate list of the minimum requirements and some replacements to their recommended lists. These specs are provided to aid in providing the most optimal performance without going overkill and searching for the top-of-the-line components that are potentially unnecessary for the given application.

How to Identify Current Computer Specs

Now that the information on what is recommended has been provided, how can the current computer be used to find it’s specs? There are a couple of different ways to find this information, but for this blog, we will stick to one. First, for the USB and video output, the best way to find this information is to locate the manufacture website where they’ll have this laid out. If the computer is custom built, wherever the component was bought from will have all the necessary information either on the website or on the box it came in. The processor, graphics, memory, and operating system can be located using the computers search option. The first thing to do is to utilize the

search option and search ‘Run’.

Figure 2: Searching Run

Once that app has been selected, the app will open, and it will prompt for information to be inputted. This will search for the specific information that has been entered and open the dialog box used to find the computer specs. Enter in ‘dxdiag’ and select OK.

Figure 3: DxDiag Search

The computer will now open the DirectX Diagnostic Tool and have all the information, except the USB and video output options, displayed in the window. Some of the information, such as the graphics card, will be listed on other pages. Comparing specs to the recommended specs supplied above can now be achieved and the ability to decide whether to upgrade individual components or computers as a whole can be decided.

Figure 4: Computer Specs

Software Testing

With all the computer specs lining up with the recommended specs from the company to the respective headset, there are some more tests that can be done to help ensure optimal performance and see areas that may need improvement. These tests are done through Steam. For those who may not know, Steam is an entertainment platform that is leading the way with virtual reality information, tests, and games. For our application, Steam has been essential for viewing CAD files in SolidWorks. Download, install and make a Steam account to be able to use this platform for testing the computer’s capability with virtual reality. Once all this is completed, the next step is to search the store and type ‘SteamVR Performance Test’. This is a free performance test provided by the company Valve. Download this test and run it.

Figure 5: SteamVR Performance Test

The software will run for a couple of minutes doing multiple tests including running some higher quality graphics while it monitors the number of frames tested, percentage of frames that drop below 90 fps, and the average quality. In the system specs area, it will highlight the OS, GPU, or CPU green, red, or yellow. Green being ready for virtual reality, yellow for it is capable, but it could be upgraded, or red for it not being ready. At the bottom of the results window, there is the option to show details and it will provide information from the test.

Figure 6: SteamVR Performance Test Results

Virtual Reality at Perception Engineering

Here at Perception Engineering, we have been implementing virtual reality with some of our CAD designs and experimenting first hand some of the benefits of this technology. We have run our virtual reality software on two different laptops and haven’t faced too many issues. The main issue has been with the size of some of the CAD files we have tested. With some upgraded components to the computers, these issues will be eliminated. The previous laptop we had been using for virtual reality was an MSI GT72 Dominator Pro. This laptop has been able to handle what has been required from our virtual reality needs. Our current laptop that we’ve switched to is an Eluktronics P650 laptop. This has been able to keep up with some of our larger files with no issues graphically with very limited to no lag problems with certain files.

Figure 7: Current VR Laptops at Perception Engineering

That’s all for now! If you like the content or have questions, signup for our email list to stay in the loop for solutions or weekly content.

Written By: 

Advanced Manufacturing Expo – Cleveland

Advanced Design & Manufacturing Expo

Have you ever looked for opportunities to place yourself in an environment where you could feel that you were surrounded by the best and brightest? A place where every conversation led to new thoughts and concepts that you had never explored before? Well I found a place like this during my recent trip to the Advance Manufacturing Expo.

The Advanced Design and Manufacturing Expo or ADM takes place in Cleveland Ohio and is a comprehensive event that showcases the latest technological advancements in robotics, automation, plastics, and design engineering. This year was the second year that the event has taken place and the first year that I was able to attend. It was about a five hour drive from Perception Engineering’s Allendale office and a perfect opportunity to take advantage of some of the brightest companies coming together in one place.

With over 250 suppliers, 2,600 attendees and 30 hours of educational courses, there was more than enough going on at this event to keep busy for the two full days that I attended. There were multiple breakout sessions that an attendee could choose from in addition to specific training tracks. New to this year’s event was a specific focus on 3D Printing and Smart Manufacturing. The breakout sessions had different formats some of which were panel discussions with crowd interactions and others were more formal with limited time for Q&A. The sessions that I enjoyed the most were the panel discussions that allotted for plenty of opportunity to dive deep into the specified topics. All the sessions were specific and had presenters that were trained and built their business around the topics they were presenting. The sessions that I attended were:

1) Capitalizing on the Changing Dynamics of 3D Printing

2) Getting the Best ROI from Your Smart Manufacturing Systems

3) Applying Machine Learning in Smart Manufacturing a IIoT Applications

4) Augmented and Virtual Reality Applications for Product Design

5) Building the Future One Layer at a Time

6) Turing Big Data from Sensors and IIoT Networked Devices into Strategic Information

7) Best Practices for Predictive Maintenance in Manufacturing

8) New Collar Job Training for the Digital Age

9) How to Optimize Packaging Design to Increase Manufacturing Efficiency

After each session I walked out with over a page of notes regarding tech and topics that I wanted to continue research on. This amount of data and access to industries experts alone would have made it worth the trip. However, in addition to the break out sessions, there was an expo floor to walk between sessions. Many of the exhibitors throughout the expo were showing off direct hands on and physical examples of the technology that was discussed and presented in the breakout sessions. Throughout the two days I spent hours in detailed discussion specifically around the topics of the future of design, virtual reality and 3D printing.

I will be on the lookout for future opportunities like this and will be encouraging the entire team at Perception Engineering to do the same. Always strive for learning and placing yourself among others that can help make you better at what you do. Hope that you enjoyed this quick summary of the event, if there are any specific questions I can answer please connect with me on LinkedIn (link below). Also, check out some video from the event which is also posted below.

Written By:

Virtual Reality: HTC Vive Setup Through SteamVR

HTC Vive Setup Through SteamVR

In this blog, we will be going through the steps to get the HTC Vive ready for use with a walkthrough of SteamVR. We will also hit some requirements on the recommended computer side of things and some issues during the setup and how to identify the problem.

Virtual Reality Setup

Setting up virtual reality for a PC can be a quick and easy process if done correctly. For this guide, we will be walking through setting up the HTC Vive. We will be touching on some items that are required before the setup process can begin, the actual process through Steam, and some issues that can occur and how to correct them.

Required Items

Apart from the VR headset itself, there are a couple of items that are needed in order to jump into the virtual world. The biggest of them all is a computer that can meet the minimum requirements set in place by the headset companies. Many of these specs will be listed on their websites. Below, I will list the recommended computer specs to run the HTC Vive.

*Processor: Intel Core i5-4590 or AMD FX 8350, equivalent or better

*Graphics: NVIDIA GeForce GTX 1060 or AMD Radeon RX 480, equivalent or better

*Memory: 4 GB RAM or more

*Video Output: 1x HDMI .14 port, or Display Port 1.2 or newer

*USB: 1x USB 2.0 port or newer

*Operating System: Windows 7 SP1, Windows 8.1 or later or Windows 10


Figure 1: Unboxed HTC Vive Set

Hitting these recommended computer specs is a large portion of having the virtual reality headset run properly and ensuring good performance. This can be a little costly, from around ~$700 to ~$4,150 for prebuilt PCs, but it is worth it if you want an optimal VR experience.

Another item required is space! This is something that can be overlooked and ignored but can make all the difference. There is always the potential of bumping or running into objects around the house or office. This can lead to tripping or damaging house or office items which is never a good thing! The controllers are fairly durable, but after extended bumping and hitting of things, they may become damaged and potentially fail to work.

Setting up Through Steam

Steam is one of the only ways to allow the computer to recognize and run an HTC Vive headset. This software is very well known as a gaming platform but has in the past couple years become the go-to service for anything VR. Before setting up through Steam, the base station should be placed in order to track both the headset and controllers. It is recommended that they’re mounted above the user’s head and placed in opposite corners of the area being used while being no further than 16.4 feet apart. Next is going through Steam VR. This setup process is very well done, easy to follow, and descriptive to ensure no issues. When you first plug in your HTC Vive, the SteamVR setup will automatically start up. The first option that comes up is whether the user would like to setup for room scale or standing room

Figure 2: Welcome to Room Setup!

only. Room scale allows for the user to walk around in a selected space while standing only is used if there isn’t much area to use VR or if the user would like to sit. For this blog, we will be using room scale. Next, space needs to be created to minimize the potential of tripping and bumping into things. From there, the controllers will need to be turned on and placed with the headset in an area that can be seen by both tracking stations.

Figure 3: Establishing Tracking

Once the controllers can be seen by both base stations, the next step is to grab a controller, stand in the middle of the play area, and point the controller at the computer monitor while holding down the trigger on the back.

Figure 4: Locating your Monitor

The next step is the easiest step of all: locating the floor by placing both controllers on the ground and selecting the calibrate floor option in SteamVR.

Figure 5: Locating the Floor

The final step in the setup process is measuring the space of the area being used while in VR. Luckily, there are no worries about having to grab a tape measure and inputting numbers into the computer. SteamVR allows the user to use a controller to walk around the play area and the software will track the path and create a real-time image of what has been tracked! One potential issue here is not mapping out enough play area. The software will give an error to go back through and remeasure until the appropriate amount of space has been created.

Figure 6: Trace your Space

The setup process is now complete! The HTC Vive is ready to be used for whatever application the user wishes. Now anytime the HTC Vive is disconnected, or the computer is turned off, SteamVR will remember and retain all of the information from the initial setup process. So, for most applications, it is just plugged and play to enter the virtual world!

Figure 7: Setup Complete

Troubleshooting

With the setup process all laid out, there are some potential issues that may arise. One issue, for example, is during the measuring out of the play area. If enough area isn’t mapped out, the software will give an error of a red play area and prompt the user to go back through and remeasure until the appropriate amount of space has been created. If enough area can’t be created, it is recommended to start over and select the standing only option.

Figure 8: Error Mapping User Area

Another potential issue is during the establish tracking section. You will not be able to progress to the next section if either the headset or controllers are not highlighted green in the Steam window. There may be a couple reasons why these items aren’t green. One reason may be because the controllers are not turned on. This is fixed by turning on the controllers or charging them if they’re dead and doing the set-up process at a different time. Another reason for this could be the base stations can’t see each other and therefore can’t track the headset or controllers. This can be fixed by adjusting the base stations to see each other and see the play area.

Thanks for tuning in this week’s blog! Have you subscribed yet? Stay up to date with the latest virtual reality content and modeling techniques. 

Written By:

SolidWorks: Online Licensing Troubleshooting

Troubleshooting SolidWorks Online Licensing

New to SolidWorks 2018, Online Licensing offers users the flexibility of accessing SolidWorks licenses through online MySolidWorks profiles. An administrative portal on MySolidWorks gives designated users the ability to assign seats of SolidWorks to members of their team. While this option is a huge step forward, in comparison to machine activation/deactivation using the modify install, implementation of online licensing companywide has uncovered many issues that have yet to be solved by SolidWorks upon their first release. This blog will hopefully ease a headache when running into errors, while trying to convert workstations over to online licensing for daily use. For help with using the administrative portal, switching serial numbers to online licensing, and for general procedural directions using online profiles in SolidWorks please reference the link at the end of this blog.

Activation issues

After following the procedure to make the switch from machine to online activation in the administrative portal on MySolidWorks, SolidWorks will require two startups before recognizing that online licensing is attached to the serial number. The first startup, after going through the standard machine activation wizard, should bring up the prompt seen in Figure 1 and the second should bring up the login screen seen in Figure 2. In this process, a bit in the SolidWorks registry is being toggled which controls the licensing type. We have run into issues where SolidWorks gets stuck on machine activation and continues to launch the activation wizard as opposed to the login screen. In this case, the SolidWorks registry will need to be manually toggled to online activation. The steps below will show how to carry out this process.

Figure 1: Serial Number Set to Online Licensing Error

Figure 2: SolidWorks Login Screen

Manually setting online licensing in the data registry

1.       Launch the redgit.exe by either searching it in the search dialog (older operating systems) or using the RUN command and typing regedit in the open bar (Windows 10)

Figure 3: Run Command

2.       Expand the HKEY_CURRENT_USER and continue to expand Software -> SolidWorks -> Licenses  -> Online

Figure 4: Registry Editor Online Licensing

3.       Double click on SOLIDWORKS to set the bit from 0 to 1. The set bits in this registry mean that online licensing is enabled for that specific program.

4.       Re-open SolidWorks and verify that the login screen appears instead of the activation wizard.

Login Issues

When someone logs into a profile that is already being used by another station the message shown in Figure 5 should appear. This message should indicate which computer that the profile is currently being used on and provide the option to force them off.

Figure 5: In Use Profile Message

If yes is selected the other user typically has a few minutes before a message appears which prompts them to save before booting them off; however, if for some reason this message doesn’t appear and instead the error message below does (see Figure 6), then follow the below procedure to delete FLEXnet files and fix this issue.

Figure 6: License Limit Exceeded

Deleting FLEXnet files

1.       Go to your C: Drive in your file explorer and select your View tab and then Options on the top right

Figure 7: C:Drive & Options

2.       Navigate to the View tab in the folder options pop up and select the Show hidden file, folders, and drives bubble

Figure 8: Show Hidden Files

3.       Press okay and select the hidden ProgramData folder that now appears on your C-Drive.  In that folder then select the FLEXnet folder.

Figure 9: FLEXnet Data & SW_D Files

4.       Remove all files that have an SW_D prefix. If any of these files fail to delete, you will need to open task manager and end any SW tasks (some may even be running in the background processes) until it lets you do so.

Logout Issues

The logout/login process has been the most difficult to work with especially with multiple users and workstations. The process of logging out, as seen in Figure 10, has one major flaw being that it is difficult to achieve without physically being in SolidWorks. If you exit out of SolidWorks without logging out (or someone boots you off), SolidWorks automatically retains your login information upon opening (i.e. no login portal). Some issues that the profile retention can cause is, one, accidentally retaining a profile that no longer has a seat of SolidWorks, which brings up the error message seen in Figure 11, and two not wanting to boot someone off who is in the middle of a project with that profile. Before learning the procedure seen below, which walks through manually deleting the login file, we tried using both the modify install login and resetting the SolidWorks registry which both were ineffective. The solution provided is the best option to clear the current profile and bring up the login screen upon re-opening SolidWorks.

Figure 10: Logout Profile in SolidWorks

Figure 11: No License Assigned to Profile Error

Manually Deleting Retained Profile Information from SolidWorks

1.       Navigate to your C:Drive and select Users -> [User Name] -> AppData -> Local ->SolidWorks -> Credentials (note: AppData is a hidden folder, go to options and the view tab as seen in the previous example to show hidden folders)

Figure 12: App Data Hidden Folder

Figure 13: UD File

2.       Delete the ‘ud.xml’ file 

3.       Open SolidWorks and verify that the login screen appears; hence, the profile is no longer retained

Resource for Setting up Online Licensing

https://www.cati.com/blog/2018/04/solidworks-2018-admin-portal-online-licensing/

I hope this blog helps with the integration of online licensing for your company needs. We look forward to a new release from SolidWorks in hopes that some of these issues are resolved, but, for the time being, feel free to try out these troubleshooting tips.

Written By: