SolidWorks: Material Callouts &Mass

Material Callouts & Mass

An important variable to keep track of when engineering a part is its multiple mass properties. With varying features and sizes the mass and other linked variables related to the mass can be changed greatly with a simple edit to the design of the given part. SolidWorks offers an easy way to assign mass properties to a part, it all depends on what material is desired. This blog will cover how to apply different types of materials to a given part and how to view the mass calculated by the part size and material.

Editing Material

The material of a part can be assigned/changed in both a single part file and inside of an assembly. In a single part file, the material option can be found in the feature tree near the top, as shown in Figure 1 below. To apply a material, right click on the “Material” option in the feature tree and click edit material. When in an assembly file the material option will not be in the feature tree. To locate the material option in an assembly, simply right click on the part of which the material will be changed and find the material option in the menu and click on the “edit material”.

Figure 1: Edit material location

Adding a Material

After selecting the edit material option, a pop-up window will appear with multiple drop-down menus to select what types of material to choose. The pop-up window and drop-down menus are shown in Figure 2. The most common drop-down menu to select material from will be the “SolidWorks Materials” file. Once the drop-down arrow has been clicked a wide arrangement of different materials can be selected from. All there is to do is click on a material and hit the apply button at the bottom of the pop-up window. That material and its mass properties are then assigned to your part model. All materials in this drop-down menu have preset mass properties.

Figure 2: Material pop-up window

Viewing Mass Properties

With each new material applied to the part there will be new mass properties as well. To view the mass properties there is a mass button located on the evaluate tab. The location of this mass properties button is shown below in Figure 3. This mass properties button is in the same location in an assembly file. However, it’s the weight of the entire assembly that is calculated when the mass properties are calculated in an assembly.

Figure 3: Mass properties button location

After clicking on the mass properties button another pop-up window will appear. This pop-up window shows all the mass properties for the part/assembly that is open at the moment. The most common properties used are placed near the top of the pop-up window, they are density, mass, surface area, volume, and center of mass. For this blog part example, a small pyramid was created and assigned malleable cast iron as the material. An example of this part’s mass properties is shown in Figure 4.

Figure 4: Mass property pop-up window example

Live Mass Updating

Even after features in the model have been changed and updated the mass properties of the parts can be updated simply by closing the pop-up window and then reopening it using the mass properties command button. For this example, the pyramid was given chamfers on all edges to change its appearance. By doing this the mass, volume, surface area, and center of mass were all slightly changed. These changes are shown in Figure 5 below.

Figure 5: Updated mass properties

Final Thoughts

Knowing the mass properties of a part before it has even been created in real life is a huge advantage to have when manufacturing and prototyping. This mass properties tool is crucial to have when making changes and adding updates to a part or assembly. This tool allows the creator to view how every change can affect the mass, volume, density, and even its center of mass. All these properties are extremely important when it comes to engineering the perfect part. 

Written By: 

Converting Files to DXF/DWG

Converting Files to DXF/DWG

When working with CAD software or in the design field, it is likely you will come across files that will not be in a CAD friendly format. Customers might send over files such as PDF’s or JPEG. These are two very common file types; however, these files cannot be input into any CAD software. Most of the time these types of files that are transferred are pictures of drawings from CAD software. Therefore, it would be very beneficial to have them in a CAD file format to be able to convert them to solids or input them as a sketch. There is a way to convert these files to DXF or DWG file types. Keep reading this blog to find out!

Finding A Reliable Converter

To convert any file to a different type, a file converter is needed. If you google the type of converter that is needed such as PDF to DXF converter, plenty of online sites will show up. However, it can be dangerous to bounce around random online sites downloading files. Not only could the file quality be extremely low, but it could also expose your computer to viruses. Take some time to do some research and look for popular sites that have good referrals or sites that are verified. Below in Figure 1 are some popular and safe file converting sites.

Figure 1: Example Converter Sites

Some of these sites will offer you a limited amount of conversions before you must purchase the software. Other sites offer conversions that are totally free. It depends on preference and file type what site will work best for you and your file needs.

Example Conversion

For an example conversion, the CAD soft tools link will be used and shown how a typical conversion is done. For this example, a PDF to DWG converter will be used. To find the correct site “CAD soft tools PDF to DWG” is typed into google. The first site link is the correct one. After the link is opened the converter and options will be brought up. CAD soft tools PDF to DWG converter is shown in Figure 2. Under the select PDF option click on choose file, this allows you to browse your computer for a file. After selecting the correct PDF file, an email is entered to send the DWG download link to. A receiving email is entered to retrieve the link at. After the consent option is checked and the convert button is hit the file will be converted and a link sent to the corresponding email.

Figure 2: File Converting Example

Once the file link has been received in the email it must be downloaded and saved to the desired file location. And that is how a PDF file is converted to a DWG file!

Why So Many PDF Files?

It appears everyone is sending PDF files for information and file sharing, why is this? The PDF format is so popular because of its wide range of use. If everyone is using the same type of file, then it will appear the same to everyone on every type of device. It is extremely important to have the same information portrayed to everyone equally when file sharing. PDF files are just the easiest way to do it. Since the PDF format is so popular it will be extremely helpful to know the information from this blog on converting files. And the next time a single PDF file is received for a drawing, you’ll know just how to use that file to your design advantage. 

Written By:   

SolidWorks: PDM Version History

SolidWorks PDM Version History

You’re working on a project in SolidWorks when you realize you or a project partner has made some unwanted changes and saved over any previous versions. It happens to the best of us. Looks like you’ll have to spend extra time remodeling the part to get it back to the way you wanted, just to spend more time now modeling the changes you wanted to make in the first place. Not so fast. If you are working with SolidWorks Product Data Management (PDM), you are presented with multiple options to potentially avoid, or quickly fix problems like this.

Version History

To find the version history of a given file, first, locate it in your vault within your file browser. If you were not working out of the vault initially, unfortunately, you will not be able to go back to any previous versions by adding it after the changes were already made. If you need any help setting up your first vault, see my previous blog post, Intro to PDM, for a walkthrough. Once you have located your file, highlight it and select the “History” button.


Figure 1: Location of Version History

This should then open a page similar to the one shown in Figure 2.

Figure 2: Example of Version History Page

Once this is open, the next step is to determine which version you need to access. The first option to do this is to read through the comments. This can be helpful; however, it can also be unreliable. There is no guarantee that anyone put a comment on when changing an event. If there is a comment, there is no guarantee that it is accurate. If you find a comment that seems inaccurate, you can edit it as seen in Figure 3.


Figure 3: Editing Comments in Version History

Once you are done editing a comment, make sure to select update. The other option for determining what version you need is done using the “View” option. Highlight a part that you think has potential to be what you need, then select the “View” button on the upper toolbar.

Figure 4: Upper Toolbar

This will open an eDrawings preview window of the selected version of a part, with which you can pan, zoom, rotate, and take measurements to confirm roughly whether this is the version you desire.

Figure 5: eDrawing Preview Window

Once you have determined which version you would like to obtain, you are presented with three options. These options are “Get”, “Save”, and “Rollback”. They can be found in the upper toolbar, depicted in Figure 4.

Get

By highlighting an event and clicking the get button, you will retrieve that version to the local cache. The changes and events made after that version will remain in the version history; however, when you go back to your file browser, the part will appear as the version that you selected.

Save

By highlighting an event and selecting the save button, you are presented with the option to save a copy of a given version. You can save this both in and out of the vault.

Rollback

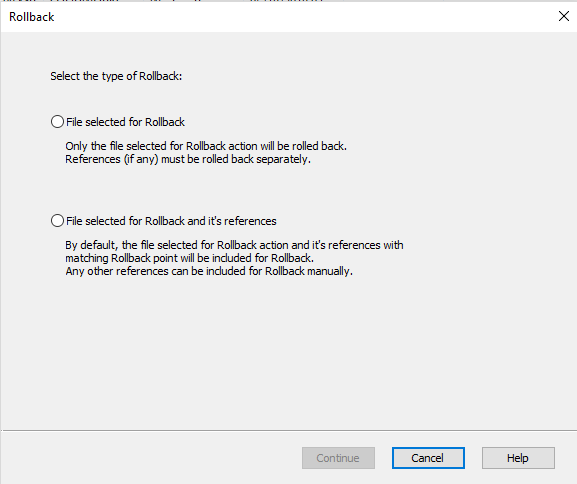
By highlighting an event and selecting the rollback button, you will delete all the events that occurred following the event highlighted. If you attempt to rollback an assembly, you will be presented with the window shown in Figure 6.

Figure 6: Individual or Reference Included Rollback

Once you have made your selection or are attempting to rollback a part, you will be presented with the window shown in Figure 7.

Figure 7: Rollback Window

Once you have entered your comments and you attempt to continue you will be presented with one final confirmation, making sure you know that all versions after the selected event will be permanently deleted. Check the selection that you understand and confirm the rollback.

Note: If you are working with various projects in different versions of SolidWorks this feature can be especially useful. If you accidentally save a project from an earlier version of SolidWorks to a more recent version, you can rollback to revert it back to a file type that works with whichever earlier version of SolidWorks it is you are working with.

That’s all for now! You now know how to navigate the version history provided in SolidWorks PDM. If you like the content or have questions, signup for our email list to stay in the loop for solutions or weekly content.

Written By: 

Creating Appearances in Visualize

Creating Appearances in Visualize

Have you come across an issue with SolidWorks Visualize where the exact desired appearance isn’t available in their wide variety of selections? Nothing is more satisfying than having what you imagine appear exactly as though in a final render. This blog will help to create inform readers on how to achieve these appearances!

What are Appearances?

In Visualize, appearances are the items that are applied to imported files or any models that are created in the software to aid them in appearing realistic. There is a large number of appearances already supplied by SolidWorks from the different type of wood finishes and metals to the more unique ones such as grass and soap bubbles. SolidWorks provides standard appearances that are saved when the software is installed, and they also have a cloud-based section that provides more custom appearances.

Different Types of Appearances

With SolidWorks Visualize Standard 2018, there are 15 different types of appearances that the user can create when creating their own. The correct selection will need to be chosen when deciding which is most applicable for the component it’s being applied to. This is fairly crucial because each of these will have a few to several different options for customizing the appearance. Some of these are simple such as the base color to more advanced like the density, roughness, and scattering of the color.


Figure 1: Examples of Appearance Options

Creating Custom Appearances

Since there are so many different options for creating appearances, for this blog we will be focusing on creating a generic appearance. To create a new appearance, first, navigate to the appearance tab, right-click within the window, and select New Appearance.


Figure 2: Creating a New Appearance


Next, select the drop-down arrow to Appearance Type and select the Generic option.

Figure 3: Selecting Generic Appearance

Compared to some of the other different appearance types, generic has many different customizing options. Below, is a brief explanation on each of these options.

  • Diffuse Color – the color that appears under white light
  • Specular Color – the colors on a shiny surface of the highlights that appear
  • Transparency Color – sets the model to appear see-through with a hint of color (good for glass and tinted glass)
  • Diffusion – adds a slight additional color to transparent colors
  • Emission – adds the color of light shown in the scene (good for users with Visualize Standard users that don’t have the option to directly add light)
  • Roughness – helps to either increase or decrease the reflectivity of the appearance
  • Internal Roughness – controls refracted light on the inside of the part rather than the surface
  • IOR (Index of Refraction) – controls transparently bent light going through the part
  • Color Density – the main thing here is the higher the number, the deeper the color will appear

Figure 4: Options in Generic Appearances

Conclusion

For creating custom colors that SolidWorks doesn’t provide in either the local library or cloud library, it’s best to get into the software and create your own. It can take some time to dial in exactly what each option does and what they’re capable of, but it becomes second nature with practice. These custom created appearances can be saved and then used on any future projects!

SolidWorks: DriveWorks

DriveWorks

Repetitive tasks in SolidWorks have you down? Do you find yourself making the same design multiple times with small differences in features, size, and properties? DriveWorks is a unique design automation software that may be able to help! The best part about DriveWorks is that if you are already using SolidWorks the most basic version, Xpress is already built in. DriveWorks allows you to quickly and easily create and configure custom designs, using captured model or assembly information, desired logic, and user-defined parameters.  With the click of a button, this program will automatically generate assemblies, models, and drawings for the desired configuration.  To get a better understanding of where and how DriveWorks can be utilized, here are the basic procedural steps in setting up a program:

1.)    Capture Driven Elements: These are the variables you intend to drive the program with. At the core, this will include Dimensions, Features, Custom Properties and continue to expand with each DriveWorks product.

2.)    Create A Form: This is your user interface with the program. This tells the user what parameters they can control and collects the desired input from the user.

3.)    Apply Rules: This is where the logic of the program is defined; rather, the parameters from the user are tied together with the elements captured from SolidWorks.

4.)    Execute Program:  This is where the program automates the modeling and drawing process using the inputs from the user and the rules you defined with the click of a button. 

Figure 1: DriveWorks Interface

There are three options for DriveWorks that can be utilized with SolidWorks: Xpress, Solo, and Pro. While Xpress is already included in every license SolidWorks; Solo and Pro are the proceeding add-ons that cost $3,900 and $9,000, with customizable module options, correspondingly. Both Solo and Pro expand the capabilities of Xpress in terms of the extent of capturable elements, form customization, and I/O control. Pro takes it even further with an entire management and configuration system that can be geared towards both web and customer interface along with other company systems.

People often compare the capabilities of design tables with respect to DriveWorks. While design tables are very useful for certain applications DriveWorks excels when considering file size, ease of use, scalability, and automated capabilities. With DriveWorks new files are generated for each configuration as opposed to multiple configurations contained within one file. DriveWorks can also control parts, assemblies, and drawings without the need to update each design table or file individually. Using a DriveWorks form provides an easier and more efficient way for anyone (regardless of knowledge within SolidWorks) to configure files, and the rule-driven elements better link the desired configuration to implement all the changes to each assembly, part, and drawing.

Here at Perception Engineering we have experimented with projects using Xpress and are always looking for ways to utilize the capabilities of DriveWorks in providing a viable solution to our customers. The ability to configure and generate models rapidly and without requiring a user skillset in SolidWorks is a unique tool we can offer and provide.

Written By:

SolidWorks: Weldments

Weldments

Weldments are a staple in the machining and design field. Designing a weldment frame one tube at a time in SolidWorks could take hours on end, only to have the design change almost immediately. Thankfully SolidWorks offers a faster way. The Weldments tab/tools allow for quick building and trimming of weldment structures by using a simple sketch. This blog will be over some of the basics of Weldments in SolidWorks.

Weldments Tab Location

All weldment tools can be found in the weldment tab while creating a part. Sometimes the tab will not be present on the toolbar, all that needs to be done to make it available is to right click on any other tab and select the weldments option. Once the weldments option is selected a weldments tab will appear on the toolbar. Also, weldment tools can be found under the insert drop down menu. The weldments tab location is shown below in Figure 1.


Figure 1: Weldments tab location

How to input weldments

To input any weldments, a sketch is needed for a profile. Weldments can be put on both regular and 3D sketches. However, it is much easier to do this by using 3D sketches. An entire welding table can be put together by using one 3D sketch. A 3D sketch can be started simply by clicking the 3D sketch button located on the weldments tab. Once the button is selected, click on the line command and choose a starting point in the drawing area, no starting plane is needed.  Next to the cursor will be the letters XY, YZ, or XZ. These letters represent the 3D direction the line will be placed in. The direction of the line can be changed by hitting the tab button. The change in direction will also be shown by the red origin arrows that appear when creating a 3D sketch. For weldments to be placed on a sketch it must be made of straight lines, no arcs or circles. An example of starting a 3D sketch is shown in Figure 2.

Figure 2: Starting a 3D sketch

Selecting the Type of Weldment

Once the desired structure shape has been created with a 3D sketch make sure all lines are fully defined and exit the sketch. Next, Click on the Structural member command on the weldments tab. Once the tool is selected there will be three drop-down menus inside the property manager to select the correct type of weldment for the job. Under the standard selection menu, either metric or ANSI inch can be chosen. Depending on what standard is chosen, some different types of weldment tubes will be shown.

Under the type drop-down menu, the different tubes can be selected. And finally, under the size drop-down menu, all sizing for the selected types of weldments will be shown. For this blog, 2” X 2” square tube will be used. The menus are shown in Figure 3 below.

Figure 3: Weldment drop-down menus

Once the Weldment type is selected it is time to start putting together groups. Weldments can only be placed into a drawing in groups, these groups must be lines that are on the same flat plane. For example, a weldment group can be on lines that are all in the XY linear direction, but not the XY and YZ direction. To input weldments onto a new line direction, the “New Group” button can be pressed into the property manager and the new group of lines can be selected. In Figure 4 below, an example of weldment groups is shown. Group1 is the top level square tubes of the table while Group2 is the square tube legs for the table.

Figure 4: Weldment group example

Corner Treatment

There are three corner options to choose from when inputting weldments. There is a mitered corner, inside end butt, and outside end butt. By selecting the corner option in the property manager, it will change all corners of the selected group. To change an individual corner, select a group then zoom in onto the one desired corner to change. There will be a small purple dot in the corner joint where the two weldments meet. If the purple dot is double-clicked, that individual corner can be changed. These options are shown in Figure 5.

Figure 5: Corner treatment options

Trimming and Extending Weldments

After the weldments have been placed into groups on the line sketch, there is a way to clean up some of the tubes if they did not come out right at joints and intersections. Sometimes, the end of a tube may not meet up flush to a corner or maybe the desired outcome is to have the tube wrap around parts of the intersecting tube. These types of options can be controlled through the trim/extend command in the weldments tab. The location of the trim/extend command is shown in Figure 6.

Figure 6: Trim & Extend command location

Once the trim/extend command is selected, the first option in the property manager is the corner type. The types to choose from are End trim, End miter, End butt1, and End butt2. After selecting the type of corner desired to trim to, there are two selection boxes for bodies/faces. The top selection box is to choose what bodies to trim, the other is the face/plane or bodies that will be the trimming boundaries. At the very bottom of the property manager is the option to do a simple cut or a coped cut. The coped cut will cause a sort of wrapping to the tube at the end to wrap around the tube it is intersecting with. An example of a tube being trimmed to be flush with the top of the upper-level tubes is shown in Figure 7.  

Figure 7: Trim & Extend example

Things to look out for

When first putting the tubes into the sketch it almost must be done like a puzzle to have them go in the way desired. Be sure to think of how the pieces would really fit together and put them into the sketch in that group order. When inputting some tubes into the sketch they can come in twisted and not centered to their intersecting tubes. This can be corrected by entering an angle value into the angle input box under the alignment section inside the property manager. 

Final Thoughts

Overall, the Weldment tab/tools available in SolidWorks can be used to quickly create and assemble both basic and complex weldment structures saving time. Using the powerful tools at hand in SolidWorks can help edit previously made structure as well, allowing for quick updating of changed designs. With the fast-moving pace of today’s work, the knowledge of how to use these tools effectively is a must and it will have a clear impact once a project has been completed.

Written By:

SolidWorks: Mass and Measuring Evaluations

SolidWorks: Mass and Measuring Evaluations

In this blog, we will be discovering the mass and measuring evaluations within SolidWorks. These tools are useful in determining the size and weight of a particular part or assembly. We will be looking at how to use these tools, as well as some applications in which they may become useful.

Measure

The measuring tool allows users to calculate the distance between selected items, points, faces, etc.. The measuring tool can be found on the evaluate tab shown below:


Figure 1: Measuring Tool

You can also find the measuring tool by going to Tools > Evaluate > Measure…:

Figure 2: Measuring Tool File Location

Once the measuring tool is open, the pop-up window should look like the image below:

Figure 3: Measuring Tool Window

The first icon in the measuring window pulls up a menu for Arc/Circle Measurements. The list below allows the user to select their desired measuring format between circles and arcs.

Figure 4: Measuring Tool Features

The second icon in the measuring window opens the Measure Units/Precision window. The measure units/precision window allows the user to set the preferences for the desired units (imperial or metric), scientific notation, decimal or fractions, number of decimal places or denominator, and dual dimensions.

Figure 5: Measuring Units/Precision

The third icon allows you to enable/disable the XYZ measurements within the part/assembly window.

Figure 6: XYZ Measurements

With this feature selected the measurements in each direction are visible similar to the blue and red lines below, indicating the X and Z measurements, in this case. If this feature was not selected, only the black line would be shown, indicating the overall distance measured.

Figure 7: Directional Measurements

The fourth icon, called point-to-point, allows the user to measure the distance between two click points. Without this feature selected, the measuring tool would measure the features of the face selected and output dimensions such as the area, perimeter, etc..

Figure 8: Point-to-Point Measurement

Mass Properties

The mass properties of a part or assembly can be found by going to the evaluate tab and clicking on the icon labeled Mass Properties.

Figure 9: Mass Properties

The mass properties of a part/assembly can also be found by going to Tools>Evaluate>Mass Properties as shown below.

Figure 10: Mass Properties File Location

Once the Mass Properties window pops up, a variety of information can be found. Within the mass properties window the density, mass, volume, surface area, the center of mass, and moment of inertia can be determined. Within the window, you also have the option to select which coordinate system these values are taken from.

Figure 11: Mass Properties Window

The evaluate features discussed in this blog are very useful tools. One example of how the measuring tool and mass properties can be used, is by aiding in determining the box size and the shipping cost of a component once the weight is known. They can also be used to help hit design requirements that are determined by specific dimensions or weight specifications  

That’s all for now! You now know the basics of SolidWorks Evaluations. If you like the content or have questions, signup for our email list to stay in the loop for solutions

Written By:

Lighting in Visualize

Lighting in Visualize

With each package of SolidWorks Visualize there are some things you can and can’t do from one to the next. This blog will focus mainly on one little issue that we’ve run into at Perception Engineering when it comes to the lighting aspect of models and some of the tips and tricks we use to overcome them.

Visualize Packages

With each seat of SolidWorks Professional and Premium, a seat of SolidWorks Visualize Standard is included. SolidWorks Visualize Standard and Professional can also be purchased separately. This benefits non-SolidWorks users because not only is it a standalone product, but with the ability to add in over 20 different file types, it’s hard not to justify the cost for this software.

Steps to Adding Lights

Being that we use Visualize Standard, there is no option to add a light directly, so we have to do some work around to create an emissive appearance that will give the view of light. Luckily, there is an easy way to do this! The first task is to create a New Project in Visualize and import the model based on how appearances are to be applied. For more information on this, please visit the Importing Options for Visualize blog. Once this is complete, the next step is to apply appearances to the components. For our example, I created a table with a couple of objects sitting on top inside of SolidWorks. I then added it to Visualize and started applying some of the appearances.


Figure 1: Table and Objects with Appearances

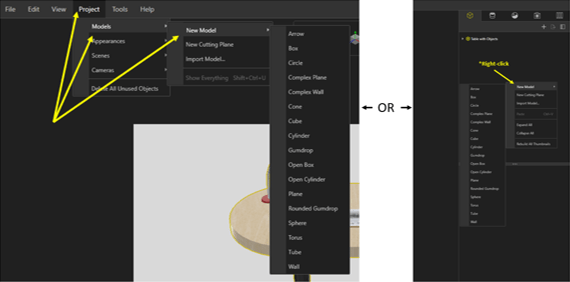
Next, being that it is a desk lamp, we want it to have the appearance of having a light bulb inserted and shining on the table. This is completed by going up to the project tab, selecting models, and a model to act as the light. Alternatively, right-clicking the palette and selecting new model will add in a new primitive object.

Figure 2: Adding New Models

Now that the model has been created, we need to position it in the place we want the light to appear at. For this example, we also added a circle model to the table to show where the light will hit. To adjust the position and the scale of these items, first select them and then we will be using the HUD to manipulate them.

Figure 3: Manipulating Models

Once these are in the correct positions, we will need to give them an emissive appearance. This can be achieved by going to the File Libraries tab and selecting emissives.

Figure 4: Emissives Appearance Folder

Now, drag something like the white light appearance to the models created earlier. This next step is important to remember to do. If this step is skipped, the models with the emissive appearances will appear as a flat white rather than appearing like a true light. Go to the Models tab, select one of the primitive models, and navigate to the general tab below. The two option we need selected are Visible and Faded. These will leave the lights there while hiding the models giving an accurate appearance to the desk lamp.

Figure 5: Visible and Faded Options

The model is now ready for rendering! Here is the final render of our desk with a couple of objects on it. Notice the created models are hidden, but the light remains. This can be done with any type of light or if some light is needed in an area that is a little too dark.

Figure 6: Final Render with Added Lights

Conclusion

All-in-all, even though it’s a couple of added steps to add lights into a render, these will help give them a more realistic appearances overall. Just because there isn’t an easier way to add lights doesn’t mean that it can’t be done. It may be tricky to orient the added models at first, but with practice these steps will take just minutes!

Written By: 

PDM: Searching Local Files

Searching Local Files

You’ve been working with SolidWorks PDM and it has worked well for the most part. Lately, you’ve noticed that occasionally the files you’re saving to the vault aren’t showing up. Especially if you’ve been working with step files (.step) or you saved files while working in offline mode. This blog will go over a quick tip that may save you hours of frustration trying to find them or worse, having to recreate them completely.

Searching Local Files

When you’re working in offline mode in SolidWorks PDM you are still able to save files to your vault, even if they were created while you were in offline mode. When you save a file that you created in offline mode, it is added to your local vault view. Once you go back to working online you may notice that the part, that was visible when offline, is now nowhere to be found. Don’t panic quite yet! It may still be there, just in your local vault view. To check, you’ll have to search for local files in the vault. To do this, go to your vault and right-click anywhere where there is empty space. It is preferable that you do this at a higher level, as it will then search through all the subfolders as well, assuring that you have no hidden files anywhere. Once you right click you will see an option, Search Local Files. Select this.


Figure 1: Search Local Files Location

If there are any files that are hidden, a dialogue box will pop up with a list of the hidden files, their location, and the option to add them or not.

Figure 2: Adding Files Dialogue Box

If you have noticed any files missing, it’s worth giving this a try. It takes seconds and it’s not only when in an offline mode that files may not appear. Sometimes, when saving SolidWorks files as step files or when step files as SolidWorks files, they may not appear either. Chances are, searching for local files could be the solution.

That’s all for now! You now know how to search for local files. If you like the content or have questions, sign up for our email list to stay in the loop for solutions or weekly content.

Written By:

What’s New to SolidWorks 2019

What’s New to SolidWorks 2019

With another year coming to a close a new and improved version of SolidWorks has been released, SolidWorks 2019. This new SolidWorks version is full of powerful new modeling tools and various other updates to help bring design and manufacturing closer together. These updates and features cover all aspects of SolidWorks including, Assemblies, Routing, Drawings, PDM, Plastics, Simulation, Visualize, and much more.

Figure 1 – Photo from SolidWorks Event

Updates to Assemblies, Parts, and Drawing Features

 Making large assemblies both run and load faster has been a goal of Dassault’s almost every year. With assemblies growing more and more complex the need for better assembly performance is long overdue. SolidWorks 2019 has done a great deal to fix this issue by taking computing stress off the CPU and sharing it with the computer’s graphics card. This allows for quick and seamless assembly manipulation. 3D textures can now be applied to 3D models. This process used to take many features and a large chunk of time to add in a simple feature like knurling. Now all the is needed is textural appearance and the use of the new “3D Texture” tool to create complex surface geometries quickly and easily. As for drawings, SolidWorks 2019 allows cell border thicknesses to be changed individually for each cell. Opening drawing documents also will now prompt a progress indication to show both number of components and time taken to open the document.

Updates to SolidWorks Visualize

 Setting up a render to achieve picture perfect accuracy can take a long time, and even longer if your session ends unexpectedly and all that work needs to be redone. SolidWorks 2019 offers a new auto-recover option inside visualize to help prevent lost work if the session is closed unexpectedly. Along with the auto-recovery features comes the denoiser option to visualize to help produce faster and more accurate renders. The denoiser is a simple checkbox option to be selected, it allows for fewer passes and faster render time using a post processing technique to filter out unfinished images. 

 Updates to SolidWorks Plastics

 As for plastic part and mold creation some changes do come in 2019 as well. With the new SolidWorks version comes the ability to add geometry based boundary conditions to models. This update allows for features on the model to be assigned as injection locations, control valve locations, and temperature boundary conditions. An enhanced algorithm has been added to allow more accurate and complicated cooling channels to be formed from sketch lines. This new algorithm gives cooling channels an overall better look and greater precision. Mesh enhancements have also been made to SolidWorks plastics. SolidWorks 2019 allows a mesh to be created before a part file has been saved off. Mesh can also be assigned faces, edges, and vertices before creation. Information about the mesh statistics can now also be pulled in 2019 allowing you to view any bad elements about the mesh and much more.

Updates to SolidWorks Routing

 SolidWorks routing has now been updated to allow the creation of partial or fixed length coverings. A “fixed length covering” tool has been added in to allow various locations and segments of the routing to have custom covers. Improvements have also been made to the Routing Library Manager. These updates to the library include displaying only essential tabs that are needed for routing creation, along with increased response speeds when switching through tabs.

Updates to SolidWorks PDM

 This new version of SolidWorks comes with a long list of much needed updates to PDM. First, performance has been improved for handling large assemblies and complex reference structures. This allows for assemblies with a large number of components to be checked in quickly and easily. Conditional notifications have been added to allow predefined conditions to be set and send transition notifications to users and groups. This also allows notifications to be sent dynamically to users based on variables found on the data cards.

Conclusion

 SolidWorks 2019 is bringing a multitude of updates and features to help users bridge the gap between design and manufacturing. It does not seem like it will be long before every tool you need to go from design to manufacture will be available to you in a single program. What was talked about in this blog was only the beginning to some of the updates in SolidWorks 2019. If you would like to dive deeper into some of these new updates or find others that were not talked about visit the SolidWorks site here: http://help.solidworks.com/2019/English/WhatsNew/c_welcome_solidworks_2019.htm?id=9e4cebd3c875458d9bcb529e16b720ab#Pg0

Figure 2 – Photo from SolidWorks Event 2

Written By: